Fixed Plumbing Considerations
Fixed Manifold Plumbing
What it gains you, what it costs you, and how to do it well if you decide to
I know it is very tempting to build a system with as much shiny stainless hardware as possible. It looks great, and it can reduce the number of hose swaps during a brew session. But honestly, those are the only real advantages — and the second one is smaller than you think.
This article covers what a fixed manifold actually costs you, what good and bad manifold design looks like in practice, and how to keep things as simple as possible if you do decide to build one. If you haven't already, read the 3-Kettle HERMS Build Guide first — the case for starting with a hose-swap system is made there in full.
The Real Trade-offs
✓ What You Gain
- Fewer hose swaps during phase transitions
- All valve operations from a central point
- Cleaner visual presentation
✗ What It Costs You
- Significantly higher component cost
- Additional structural support required — the manifold must be bolted to the stand
- Higher heat loss through stainless fittings and pipework
- CIP cleaning required after every session — not optional
- Pumps are much harder to remove for cleaning or blockage clearing
- Additional drain points must be included
- Many bends and elbows reduce flow rate
- Some complicated connections simply cannot be made rigidly in stainless
In a well-planned hose-swap system, you will move 2–3 connections per brew session. Each swap takes under a minute and, if done correctly above the liquid level or with valves clamped shut, spillage is a teaspoon or two. Once you have actually brewed on the system a few times, you will have a much clearer sense of whether those 2–3 swaps are genuinely a problem worth solving.
And don't overlook the advantages silicone hose brings that stainless cannot:
- Flexible — routes easily around complex layouts without precision-cut rigid sections
- Transparent — you can see liquid moving, which helps with priming and troubleshooting
- Better insulated — lower heat loss than stainless pipework
- Trivial to drain — unclip and lower the end into a bucket
If You Do Build a Manifold — Keep It Compact
If you have brewed on a standard system, identified a specific pain point, and decided a manifold solves it: the key is to keep the fixed portion as small as possible. Use short stainless sections in the manifold core where rigidity adds value — pump connections, valve clusters, the sight glass — and silicone hose for the longer runs to the kettle ports. This gives you the operational benefit of the manifold without compounding the heat loss, cleaning, and maintenance costs.
Pumps and valves should be positioned at the front of the system where they are easy to reach and the pumps can be removed quickly. You should be able to pull a pump for cleaning or to clear a blockage without dismantling the manifold. If your design makes that difficult, it needs to be simpler.
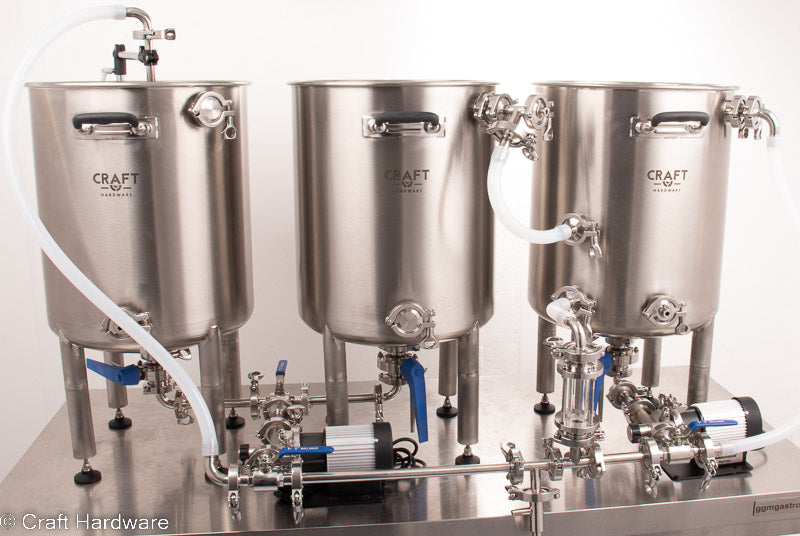
Silicone hose for the longer kettle runs, a compact stainless manifold core, pumps and valves at the front for easy access. A single hose connection is moved during the session — the left pump inlet moves from MLT to BK when transitioning to boil. The system can be drained easily and the pumps can be removed without tools.

Note the drain and sample valve access, the clear valve handle orientation, and the way the pump is mounted so it can be removed without disturbing the rest of the assembly.

What Overengineered Looks Like
For comparison, here are two examples of manifolds that have gone too far. Both are functional, but both create issues.
This design uses rigid stainless throughout. The extra heat loss is significant, and more importantly: the weight of the manifold bears directly on the pump body and kettle fittings rather than being transferred to the stand. This places stress on connections that are not designed to carry structural load. The manifold also needs additional external support to be stable.
This one looks spectacular. It is also very difficult to clean completely, nearly impossible to drain fully, and the pump cannot be removed without significant disassembly. The weight requires substantial additional support. After a few brew sessions the novelty of the aesthetic wears off; the cleaning overhead does not.

Design Principles That Matter
If you proceed with a fixed manifold, get these right from the start — retrofitting them after the fact is very difficult:
- Mount the manifold to the stand. All weight must transfer to the stand frame, not to pump bodies or kettle dip tube fittings. Use table clamps or welded brackets.
- Do not preload fittings. Every connection must come together without force. If sections need to be pulled or pushed to mate, the assembly is under mechanical stress that will cause leaks over time. Adjust clamp positions until everything aligns freely before tightening.
- Standardise valve handle orientation. All closed handles in the same direction — all up or all down — so valve state is readable at a glance. Inconsistency leads to operating errors.
- Design drain points in from the start. Every section that can trap liquid needs a way out — a drain valve or removable end cap. You will need to drain the circuits between phases and after CIP cleaning.
- Use 1" fittings for an 85L system. The manifold must not restrict flow. Undersized fittings in a fixed assembly are far harder to change than an undersized hose.
- CIP requires cycling every ball valve. During clean-in-place, open and close each ball valve several times to ensure cleaning solution reaches the valve seat. A valve left in a fixed position during CIP will have untouched residue on the ball and seat. Design valve access accordingly.
A Personal Note
If you have a sketch of a planned manifold layout and want a second opinion on whether it is achievable and practical, send it through — we are happy to look at specific questions about compatibility and design. We do not offer full system design consultations, but a targeted question about a specific connection or layout is always welcome.