
Brew Day With The HERMS Duo and Steam Condenser
Today I am brewing a version of my Tropicana IPA on my go-to brewery setup: the 2 vessel HERMS Duo. This system uses the unique semi-sparge method and is designed to minimize the cost and complexity of having a HERMS system: it uses 2 kettles, one heating element, one pump, and one temperature sensor. The system can be operated side by side or stacked vertically using the kettle rack if you don't have the space.
There are a few trade-offs to stacking the kettles, which I will mention below.
The Design
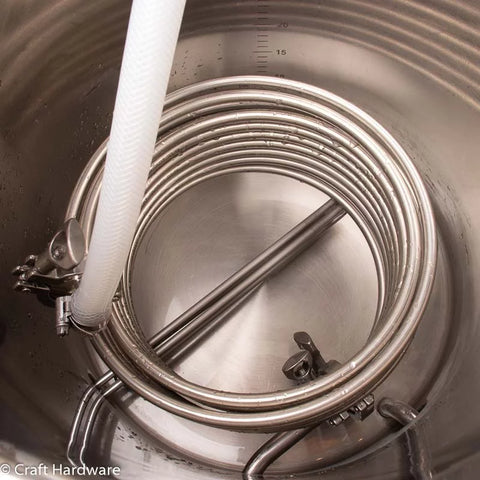
The vessel on the left is the combined hot water tank and brew kettle. Inside it you will see the 3.2 kW heating element, a HERMS spiral (the high flow double coil version) and a dip tube for the kettle outlet.

On the right is the mash and lauter tun. It has a false bottom on the 2cm stand with dip tube. There is also a manual thermometer at the bottom, this is extraneous but nice to check temperatures at a glance.
The kettle outputs are connected after the ball valves via a tee fitting and a 90 elbow to the pump input. The pump is oriented vertically below the level of the kettles - not strictly necessary but it does help with priming in this orientation.

The pump output (HERMS coil input) has a ball valve to control flow. Out of the pump the liquid (wort) enters the HERMS coil input in the HLT / boil kettle, flows through the HERMS coil, and out the top of the kettle back to the mash tun via the sparge arm with tee fitting and temperature sensor.

There is no mixing of the water in the hot water tank - this is by design, as we will use any temperature stratification to our advantage. When mixing the HLT to eliminate stratification, you have to heat the entire volume of water to achieve your target temperature. Without the mixing, we are targeting the heat on the top portion of water in the kettle, which essentially allows us to heat a smaller volume of water faster. It's not like the bottom of the HLT will be cold - there is still thermal "mixing" it just takes longer.
Wort will be circulating from bottom to top in the HERMS coil. By making sure the wort circulates past this warmer area last, we maximize heat transfer. This design lets you run on one pump and I have found it can result in as good or even better temperature ramp rates compared to mixing the HLT.
The single temperature sensor is placed just before the return to the mash tun, and is used to control temperatures with a simple hysteresis program. This arrangement is optimal for this setup and keeps things simple. PID control is not required, and there is no excessive heating element cycling.
The Brew Process: Mashing
After my reverse osmosis water was ready I poured the total brew volume into the boil kettle. I placed the sparge arm into the hot water tank to circulate within the kettle for initial heating. I added my brewing minerals to the RO and turned on the pump and the heater, setting the controller to a 68C strike temperature. My mash schedule is 66C, but we will lose a few degrees when pumping the strike water into the currently cool mash tun, and then again when we add the grain. It took 40 minutes to raise the temperature from 20 to 68C, a ramp rate of 1.2C/min - note this is not in HERMS configuration.

After reaching 68C I moved the sparge arm over to the mash tun and filled it with the desired strike water - 12L in this case. Because this was a small 15L batch, I realized too late that I forgot to add enough extra sparge water in the HLT to cover the coil entirely. The top ~1.5 coil windings were exposed at the top, this will not help with ramp rates! But I decided to push on anyways, not wanting to change my water chemistry by adding 5L more tap water to the mix.
It's totally fine to add more sparge water in the HLT to cover the coil completely for small batches! Whatever water you don't need for sparging can be pumped out before lautering. Plan for it in advance when preparing your brew water.
After a few more minutes of circulation, it was time to dough in. Make sure to turn off the pump while doughing in, and then give the mash a quick rest to let the grains soak up some water for a few minutes before beginning recirculation.

NOTE: don't forget to turn off the heater whenever the pump is off - temperature control will not work because there is no circulation past the sensor, and the heater will overheat your water!
At this point the first valve change is made: the hot water tank output valve is closed, and the mash tun valve is opened. The pump output is nearly all the way closed as well - we want to start pumping slowly to avoid any compaction issues. After starting the pump, I slowly opened the pump output (HERMS input) to full open. With the double HERMS coil the flow rate is about 9L/min and I have yet to have any stuck sparge issues at that flow rate.
I adjusted the output of the sparge arm to just below the wort level to avoid unnecessary oxygen pickup, and set the mash program to start. Although I enjoy checking on things throughout the mash, I really didn't have anything to do for the next ~75 minutes.

The umbrella effect from the sparge arm. Make sure to put it under the wort level

Beginning of mash schedule. Wort still cloudy

Halfway through, cleared up nicely

Layering in the hot water. Crystal clear on top!
Craftbeerpi moved to the mashout step after 60 minutes, and raised the temperature to 77C. This took 16 minutes to raise the temperature 11C, giving us a HERMS ramp rate of 0.65C/min. It would have been better had the whole coil been covered with water!

The Brew Process: Semi-Sparge
The 2 vessel HERMS system uses what I call a "semi-sparge" technique to increase efficiency while maintaining simplicity. The hot water is pumped over to the mash tun very slowly, allowing it to layer on top of the sugar heavy wort. This stratification increases our mash efficiency by allowing us to rinse the grains with the ever more pure water on top as we lauter back over to the boil kettle.
I took about 8-10 minutes to pump over 20L of hot water, slowly raising the sparge arm as it went to keep it at the top of the water level. It's hard to see in the pictures, but you end up with a very clear pool of water on top of the grain bed. Here is how it looks in practice:
Make sure your heating element is off at this point! You don't want to dry fire it! I filled the mash tun with enough water for the boil, plus grain absorption losses and an additional safety factor to account for system losses. You can easily add an additional few liters here on top, it should not affect your efficiency and ensures that you will completely capture your pre-boil volume. After I had collected the desired amount of water in the mash tun, I turned off the pump and closed all the valves.
Now we want to drain any remaining water from the pump loop, hot water tank, and HERMS coil. A bucket is essential here. Make sure you raise the sparge arm above the mash tun water level, or you will siphon out the mash tun when draining the coil!
Disconnecting the pump output hose allows all the water from the coil and pump loop to drain nicely into your bucket. Then the HERMS coil in removed; this only takes about 10 seconds (I love Tri-clamp). The coil is clean and can be set aside to drain and dry.
Note: you can optionally leave the HERMS coil in place and use it as a cooling coil, but I would only recommend this if you have well water available because the higher flow coil is not designed to be a wort chiller, and you will use a lot of water. Another side benefit of removing the coil is that the remaining HERMS kettle adapter will act as our whirlpool arm after the boil is complete. I recommend that you get a separate wort chiller.
I used a towel to mop up any remaining water in the brew kettle. There is only about 0,5L in the bottom, but this will slightly dilute your wort and it's easy to mop it up so you might as well.
Now we can see the disadvantage of using this system in a stacked variation. These issues can certainly be planned for, but you should be aware if you are considering operating this as a 2 vessel stacked HERMS.
- You can't remove the HERMS coil for the boil - the full mash tun is resting on top of the boil kettle - so you will want an additional whirlpool arm
- If you do choose to use an additional wort chiller, it needs to fit inside the diameter of the HERMS coil
- You can't effectively remove the remaining 0,5L from the bottom of the boil kettle and this will dilute your wort slightly.
Now comes the actual lauter step. This is straightforward and only requires closing the pump output valve to restrict flow for a slower sparge rate. Then open the mash tun outlet, turn on the pump, and fill the kettle to the planned boil capacity. The wort enters the brew kettle through the remaining HERMS adapter (now whirlpool port).

Today I wanted to demonstrate just how little grain makes it into the boil kettle and also measure the sparge gravity towards the end of the sparge, so I sparged into the boil kettle via the sparge arm through a hop sack. As expected, the gravity dropped throughout the sparge and by the time I had the kettle filled to the desired 24L, the gravity was 1.015. Below you can see the contents of the hop sack after sparging; I couldn't find a single grain husk in there.
As soon as the water level in the boil kettle covered the element completely, I turned on the element and starting heating the wort. It wasn't long until we were boiling and it was time to turn on the steam condenser.
Boiling With The Steam Condenser
I brew in our cellar and after changing my brewery around, I no longer had a kettle hood vent to use. I have been looking for an alternative to just turning on a fan in the window, hence the steam condenser. More background can be found in this other blog post.


As soon as boil temperature was reached, I put the lid on the kettle and turned on the water flow to the steam condenser. You might notice the lid I am using has the immersion chiller lid adapters built in; I closed these with a stopper to prevent steam escaping. I drained the output of the steam condenser into a bucket below the kettle. This had to be emptied 2 times during the 90 minute boil. I'll be draining directly to the sink at some point.
The boil was way too vigorous and I had to reduce the 3,2 kW heating element to 70% power to prevent a boil over with the steam condenser. I expected this to happen but forgot to adjust the boil off rate in my recipe. Turns out my boil off rate was only 3.3L/min instead of my usual 4.5L/min. In the end I had a higher volume of more dilute wort. Oh well.
Don't use the steam condenser unless you have the ability to control your heat input! You will need to adjust the power lower to prevent boil-overs.
The steam condenser worked really well and I am happy with the results. There was virtually no steam escaping and I did not notice any really bad odor from the runoff water. Yes, you can smelled the cooked corn aroma of the DMS, but it was nothing too striking to me.
One more thing to keep in mind if you want to brew with the steam condenser: be VERY careful when opening the kettle lid! There is an ever so slight vacuum in the kettle from the condenser effect, and when you pull off the lid steam will come rushing out. If your arm is over the spot where you raise the lid, you will get burned. Ask me how I know this!
After 80 minutes I added the first charge of hops and let it boil another 10 minutes. With 5 minutes to go, I put the chiller in place, and turned on the pump to sanitize both the chiller and pump loop. At flame out I added the second and last hop charge, and let that circulate in the whirlpool about 10 minutes before turning on the cooling water ever so briefly. I let the system hit 80C, turned off the cold water, and let the whirlpool go another 20 minutes before finishing the cooling cycle.

With my planned 72% brewhouse efficiency, I expected to get 15L of 1.063 wort but ended up with 17.5L of 1.055 wort in the fermenter. The numbers result in the same overall brewhouse efficiency. If I had only accounted for the lower boil off rate then I would have hit the expected targets. Hey I get a bit more beer to drink with a little less alcohol... there are worse things I guess!
The cleanup
Cleanup with a Tri-Clamp based brewery is a breeze. During the boil I cleaned out the mash tun. All the clamps, gaskets, and fittings are soaked in hot water and brushed clean - having a soft round brush that fits into the 15mm fittings is a big help - while the kettle gets a quick wash with Barkeeper's friend. The latter contains oxalic acid which will fade the etchings in the kettle, but not if you are just doing a quick wash and rinse. I have not seen any adverse effects after a few minutes of contact time with barkeeper's friend. Use the soft side of the sponge only! You don't want to scratch that mirror finish with a hard scouring pad. Let the cleaning product do the work.
And that's pretty much it. Don't forget to open and close the ball valves while cleaning them to help get the liquid out from around the ball seat. If you won't be brewing again for a while, I do recommend taking the valve apart completely and really getting it clean (and dry). Same with the pump head. Hops tend to accumulate there and it's hard to get it totally clean without taking the head off.
At the end of the day I had a huge pile of stainless steel drying in the dish rack and it was time to enjoy another cold one. Cheers!

Heavy Metal

 All done!