
I've been fermenting in and drinking from soda kegs for years. Over this time I have experimented with many different cleaning products and techniques, and eventually building my own keg washer and keg rinser products. Today I am going to show you my process and a few tips for cleaning your NC kegs.
The setup
First of all, this post will shamelessly promote my own keg washer and rinser products, so apologies in advance. Obviously there are other products on the market that perform similar tasks, so just substitute those if you prefer.
For my setup, I have a large utility sink with a spray arm and faucet attachment. This was an investment, but money well spent: my brewery kettles fit easily in the sink and it is deep so I don't splash water everywhere. They are not cheap but makes your cleaning process so much easier. I also have a second water connection, that bypasses the faucet completely. Most faucets have a flow restrictor which is great for normal washing up, but when using the keg rinser I want to have full flow available.
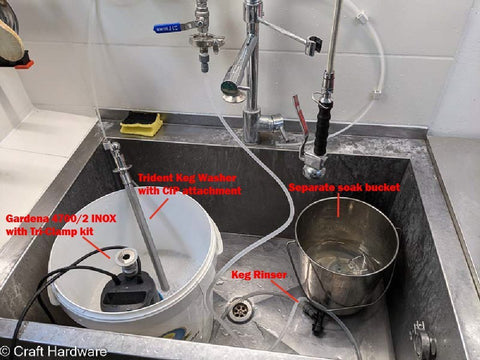
The equipment I use is the Keg Rinser, the Trident Keg Washer, the keg washer rotating spray ball adapter, and the Tri-Clamp Keg washer pump adapter set. I also have a clean toilet brush (dedicated to keg use) and a keg brush attachment for my drill (www.carboycleaner.com). For cleaning solution I mix Chemipro Oxi as directed on the bottle. The pump is a high pressure, high flow well pump, the Gardena 4700/2 INOX. It has enough power to drive the rotating ball and enough flow to get a good mechanical cleaning cycle. The Bacoeng 400 pump is a great alternative, but only use it without the rotating spray ball attachment.
The Process
I normally leave my dirty kegs laying around for a while until I have 3-4 to clean at the same time. I don't bother opening them for a first rinse until cleaning day, I prefer to just leave them laying around in their CO2 atmosphere which theoretically helps prevent them getting moldy (or maybe I am just looking for a lazy excuse). Here is my cleaning day procedure.
Step 1. First Rinse. Release keg pressure, open and dump the keg out. Do a first rinse with the keg rinser using fresh water. If the keg is heavily crusted, I fill the keg with the keg rinser and let it soak while I move on to the next keg.
Step 2. Wash Cycle. I let the lid soak in a separate bucket of hot cleaning solution. In a larger bucket I setup the keg washer in lukewarm cleaning solution and connect the first keg. Then I run about a 5 minute cleaning cycle.

 Chemipro Oxi gets a bit foamy when using the high power pump and CIP ball

For very tough cases I break out the drill brush attachment for additional cleaning. The white tape on the keg handle marks the CO2 valve
If the keg had a fermenter thermowell installed, you should remove the thermowell and replace it with the original dip tube for the cleaning cycle. I typically dedicate two of my kegs as primary fermenters. If the freshly cleaned keg is a fermenter, after the first cleaning cycle I disassemble it completely, disassembling both valves and removing the o-rings for cleaning. I brush dip tubes inside and out, and usually give the keg an extra cleaning cycle with the drill brush adapter.
Step 3. Second Rinse. Reconnect the keg rinser and give it a fresh water rinse.
Step 4. Inspect / reclean. After a fresh water rinse use a flashlight check if there any residue left in the keg. At this stage if there is anything left to clean, I might use the hand brush or even my drill brush adapter. Mostly these are only needed for my fermenters.
Step 5: Storage. If to be used as a fermenter again, simply let it air dry and then reassemble for future use, it can be disinfected on brew day. For secondary and drinking kegs I like to purge the oxygen and store them under pressure. For this I have a separate keg, from the last cleaning day, filled with a Starsan solution. With both kegs closed, I transfer all the Starsan with C02 pressure to the freshly cleaned keg. The first keg, once emptied, is then pressurized to 1 bar and has a nice C02 environment, ready for future use. I store kegs like this for up to a year. The Starsan is normal strength, made with RO water and stored up to 6 months before replacing.
Tips
- Standardize all your keg valves. My valves all disassemble with the same 17mm wrench and have interchangeable springs and poppets. Makes disassembly and reassembly much easier
- If using the keg washer, make sure none of your keg valves are bent. They should all be vertical. Go through all your kegs and check them at least once.
- If the keg washer is difficult to install, stop and check the keg valves for vertical alignment. Make sure you are not confusing the gas and liquid posts! You can also adjust the width of the keg washer by screwing or unscrewing the gas side of the washer assembly. Keg lube also helps a tight fit.
- Make it easier to identify the gas valve on your kegs. I put a few pieces of white PVC electrical tape on the side to make it clear as day.
- It's nice to have multiple water connections at your sink!
- Having a large utility sink makes your cleaning day so much easier.
- Use your cleaning day to inspect your keg o-rings and replace them if worn or torn.