
In this article I'll show you how to build a simple and inexpensive inline filter system that you can use when transferring beer in a closed system, using C02 pressure to move the beer from one vessel to another. If you have a conical fermenter with the ability to cold crash, you probably don't need additional filtering. But if you are using a closed fermenting system and finding it hard to filter out that massive dry hop charge you love to add, this may be just the thing for you.
I've been fermenting in stainless steel NC (Cornelius) kegs for about 2 years now. I operate it as a closed system to prevent oxygenation of my beer as much as I can. I'll have another article dedicated to corny keg fermentation soon, along with a few new products to facilitate the process!
When I dry hop with pellets, I don't like to bag them. I want them to get as much contact with the beer as possible. But I also want to get the bulk of the plant material out of my finished beer before serving. Cold crashing is a get start, but I find I'm still getting more vegetal matter in my serving keg than I would like. When I want really high clarity and low residual yeast in my beer, I use my 5 micron and 1 micron Clarifier stainless steel filter that I put inside a modified Tri-Clamp spool. They clog pretty quickly and take a long time to make a transfer, but when you want that level of filtration they are hard to beat at the homebrew scale.
I was looking for something that is easy and fast to use. I already own a water filter housing and a few hop socks, so recently I got the idea to use a hop bag as the filter medium. The results were good enough to share as a simple DIY project. If you want to prevent a large amount of that hop material from getting into your serving keg, the instructions and parts list is below. Instead of a hop bag you can also try a small stainless steel dry hop baskets, more on that below.
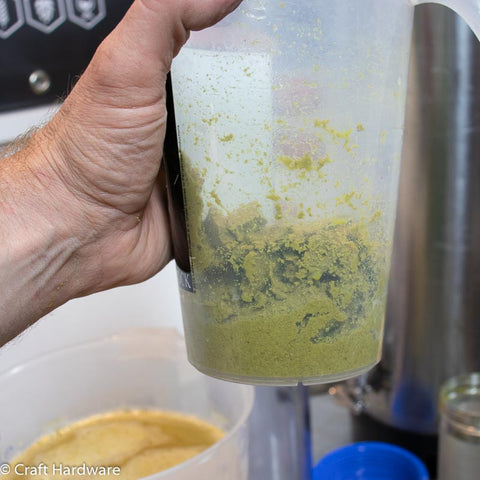
For the demonstration I made a hop slurry with 4 liters of water and 100g of pellet hops. That's a crazy 25g/L dry hop rate! If you're wondering how I got that out of the fermenting keg without clogging the poppets, please be patient, I will be introducing a new product shortly!
Parts List
- 1x Filter housing with 1/2" female threads. I have this one here from Planet Aqua.
- 1x 1/2" x 19mm hose barb. The fit is critical and I have several that were too loose for the application. The ones that I know work are the EF816 1/2" x 19mm from PVC-Welt. I am sure there are others. A short piece of 19mm stainless tubing works as well, and does not have any threads to clean.
- 1x Hop sock or stainless steel keg dry hop filter (pictures below)
- 1x o-ring, approximately 12-14mm ID, to fit over the 19mm hose barb and hop sock. Keg post o-rings work well.
- 2x 1/2" hose barbs for the in and out connections on the filter. Your tube size will vary so find ones that fit your tubing.
- Hose clamps and fittings to make the connections to your keg liquid disconnect posts and your in/out filter barbs.
Instructions
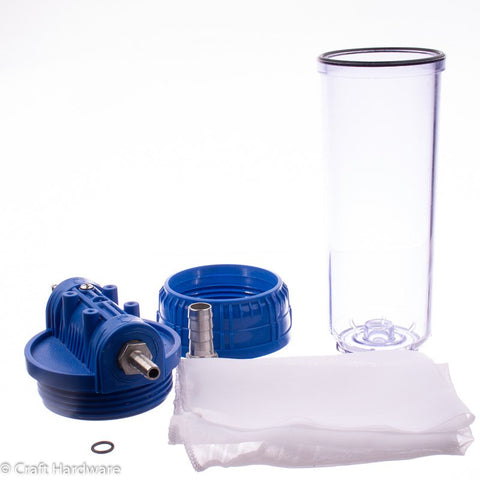

The main parts

 The 19mm hose barb will be inserted into the center inlet
- Attach the in and out hose barbs to the filter. Pay attention to the in and out ports. the input should flow into the center opening in the filter.
- Take the threaded end of the hose barb and put it into the opening of the hop filter sack.

- Wrap the hop filter sack around the hose barb and secure it in place with the o-ring.

- Insert the hose barb into the center inlet port inside the filter housing. Make sure it is tight.

- Assemble the filter housing.

- The filter is ready to use. Sanitize and purge. I like to fill it with Starsan and push it all out with CO2 to achieve both.
- Connect the fermenting keg and the serving keg. Make sure your inlet flows into the hose barb and so into the hop filter bag. the Outlet should be on the outside of the bag (within the filter housing)
- Push the beer from the fermenter through the filter into the serving keg. I used 1 bar pressure. Here I filled a clear container for demonstration purposes. I also swirled the keg to get all the hops in suspension. I had to shake the filter a few times to knock down the hop debris that was collecting at the top of the bag.

- After the fermenter is empty, I turned the filter upside down to get the rest out.

The results were pretty darn good. Some very fine material did make it through, but my goal was just to prevent the bulk of the hop and trub material from making it into the serving keg.

All done

 Nice pile of hops!
Next I tested a similar setup using a keg dry hop filter. You can find these in brew supply shops and elsewhere on the internet. Here is how it looks, after I drilled a 21mm hole in the lid to the install the 19mm hose barb:


Notice the large holes in the lid? I cut a round silicone gasket to cover those up. There is a G1/2" pipe washer under the nut to help hold the gasket flat. Then I just stuck the hose barb into the water filter, screwed the dry hop filter together, and assembled the filter housing. This time I used John Guest fittings for sake of convenience in making the hose connections.
The results were also impressive:

The filter was lined top to bottom with a thick layer of hop material
I scraped the filter contents out into a cup

I strained the filtered liquid through my 150um Sputnik filter to see how much hop material made it through. It's not too much, considering what I started with.
Both of these filters did a pretty good job of filtering out the gunk, and I was happy with the results. Between the two I liked the stainless steel filter better, because it didn't clog during the filtering process. The sock has a smaller inlet, where the hops began to stack up and I had to shake them loose. The basket filter was easier to use.
Add a good cold crash before filtering and you should be get very good results with this simple and easy DIY filter. You can build it for about 30€ (hop sock version) or 40€ (filter basket version). I am considering offering this item as a kit so you don't have to order from 4 different stores to assemble it. Let me know if you are interested!